| Microsoft Office 2010 Home and Business | Descarca |
| Office Professional Plus 2010 | Descarca |
| Office Professional Plus 2013 | Descarca |
| Office Professional Plus 2016 | Descarca |
| Office Professional Plus 2019 | Descarca |
| Acrobat Reader Pro | Descarca |
| Windows-Office | Descarca |
| Outlook continually prompts for your password when you try to connect to Microsoft 365 | Descarca |
Don’t worry, if you don’t see the “Import passwords” option in Chrome password manager. You can enable it by using Chrome experimental features. Go to “chrome://flags” command URL and search for “Password import” flag. Enable it and relaunch the browser to see the password import option is available in the settings page.
Boot From a Windows 7 Install Disc or Flash Drive
To begin, you’ll need to boot from a Windows 7 Setup disc or flash drive. If you’re booting from a disc, watch for the Press any key to boot from CD or DVD or similar message and be sure to do that.
If you’re watching closely, you may catch a Windows is loading files screen. If you see that, or an Install Windows screen, or a System Recovery Options screen, you’re in good shape and can continue on to the next step.
Click Next
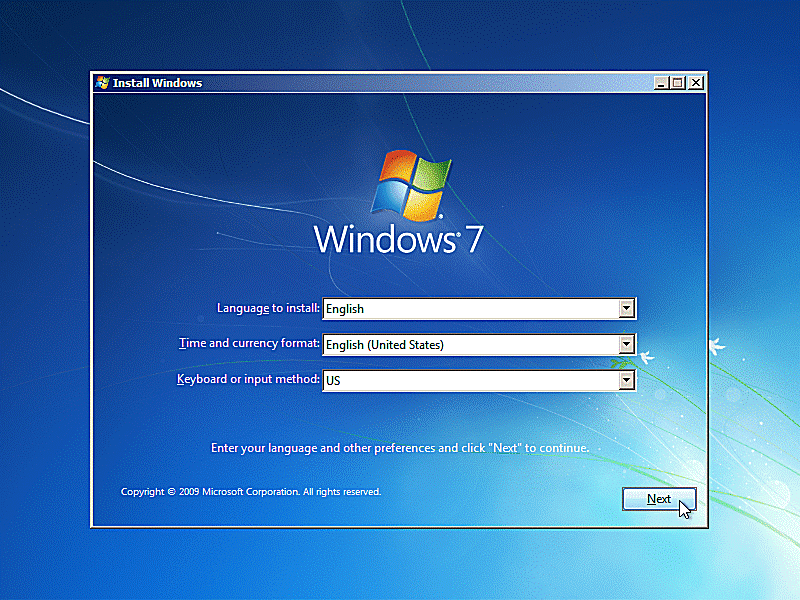
On the Install Windows screen with the big Windows 7 logo on it, check that the language, time, and keyboard options work for you and then click on the Next button.
Note: If you booted from a Windows 7 System Repair Disc, what you’ll see here instead is a small System Recovery Options window with just a keyboard option. Click Next>.
Click on Repair Your Computer
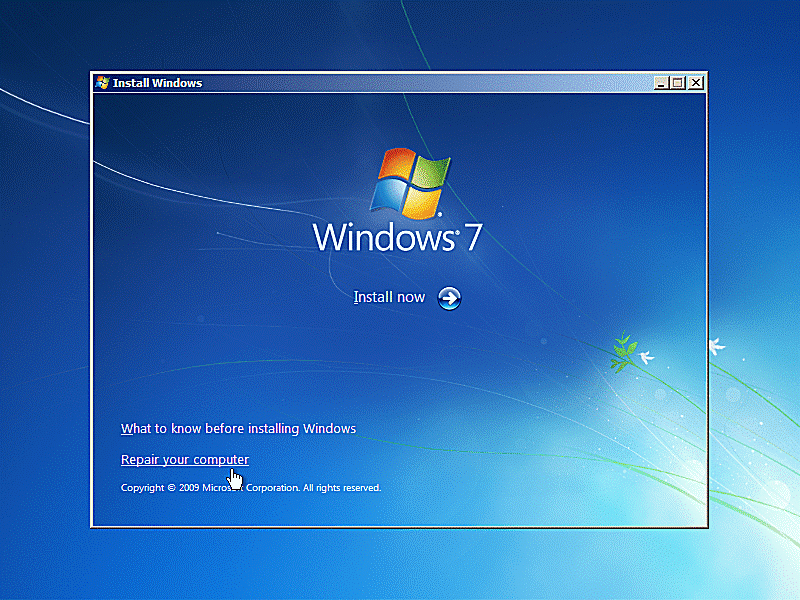
Repair Your Computer Option for Windows 7.
Once again you’re at the Install Windows screen with the Windows 7 logo. This time, however, you have an Install now button and some options at the bottom.
Click on the Repair your computer link, right above the Microsoft copyright note at the bottom of the screen.
Wait While Your Windows 7 Installation Is Found
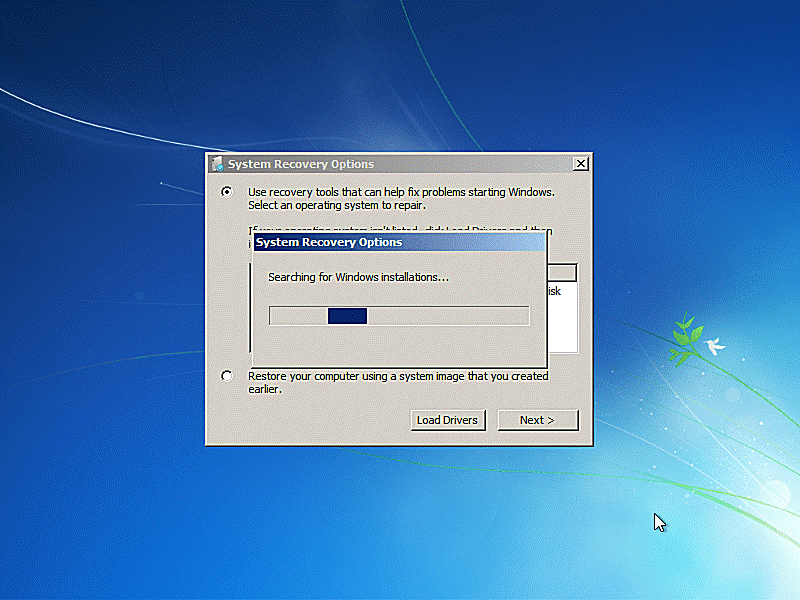
Next, you’ll see two windows, both labeled System Recovery Options, one on top of the other. The one on top says Searching for Windows installations….
All you need to do here is wait, but I wanted to show you what the process looks like. Once this screen disappears, you can move on to the next step.
Note Your Windows Location & Click Next
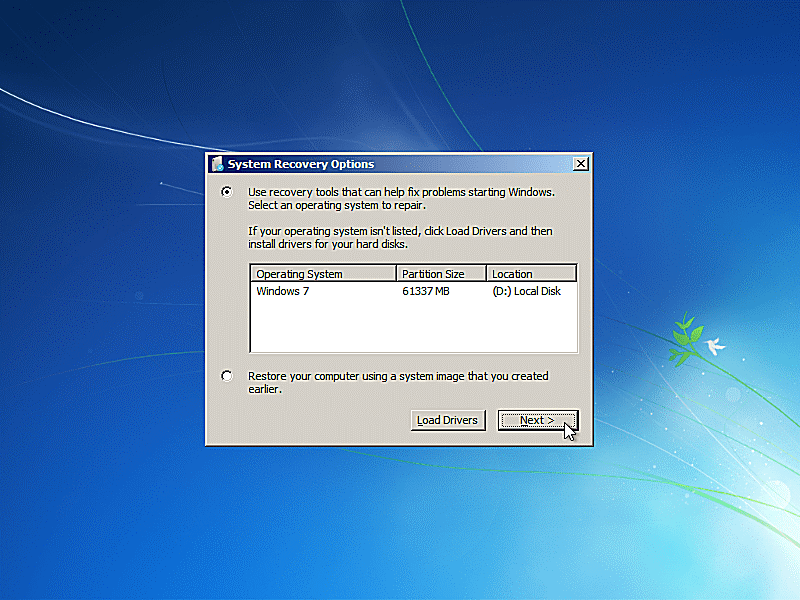
Now that the small window with the progress bar is gone, jot down the drive letter shown under Location. On most computers, this will be D: but yours could be different depending on how Windows 7 was originally set up.
Note: While you may be used to seeing the drive Windows 7 is installed on as C: while working from within Windows, most computers are set up with a small recovery drive that’s normally hidden from view. Since drive letter assignment is dynamic, and this small hidden drive is visible when working from System Recovery Options, your main drive has probably been assigned D:, the next available drive letter.
Once you’ve committed that drive letter to memory, select Windows 7 from the Operating System column and then click the Next> button.
Tip: Don’t worry if nothing is listed under Operating System. System Recovery Options needs to locate Windows 7 only if you plan on performing certain operating system repair tasks, none of which we’ll be doing as part of this password reset process. In any case, be sure to select the Use recovery tools that can help fix problems… radio button before clicking Next>.
Choose Command Prompt
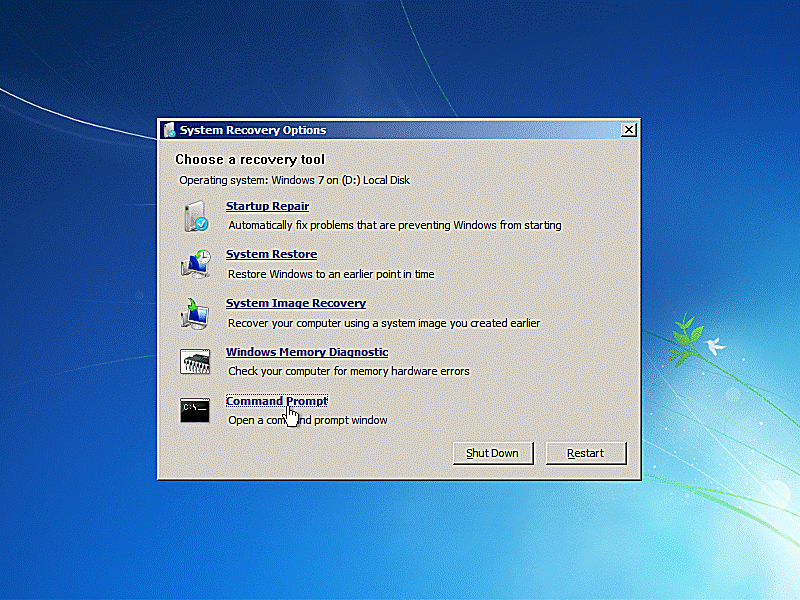
From the list of recovery tools available on System Recovery Options, click on Command Prompt.
Execute These Two Commands
Now that Command Prompt is open, type the following command exactly as shown and then press Enter:
copy d:\windows\system32\utilman.exe d:\
In case it’s not clear, there are only two spaces in this command: between copy and d:\ and between exe and d:\.
Assuming the command was executed correctly, the text 1 file(s) copied. should have appeared directly under the command string and you should now be at a prompt again.
Next, type this command exactly as shown and press Enter.
copy d:\windows\system32\cmd.exe d:\windows\system32\utilman.exe
In this command, there are also only two spaces: between copy and d:\ and then between exe and d:\. This time, however, you’re presented with a question after executing the command:
Overwrite d:\windows\system32\utilman.exe? (Yes/No/All):
Type Y or Yes at the flashing prompt and then press Enter. As with the last command, you should see the 1 file(s) copied. confirmation.
Important: If the Windows 7 drive letter you noted in Step 5 was something other than D:, swap out all instances of d in the commands above with whatever drive letter you noted.
What Did I Just Do?
The first command made a backup copy of the utilman.exe file so you can restore it later.
The second command copied the cmd.exe file overtop the utilman.exe file. This action is what makes this whole Windows 7 password reset trick work. You’ll undo this later.
Remove the Boot Media & Press Restart
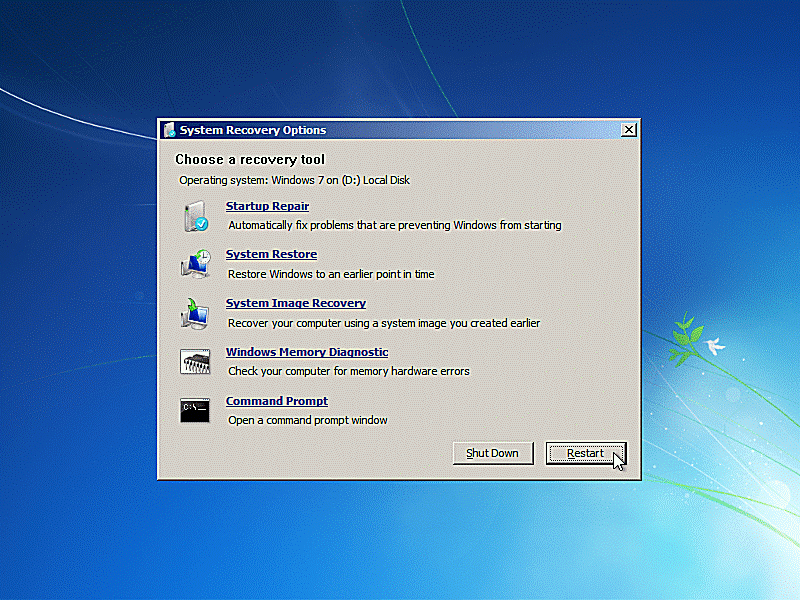
Now that the two commands have been successfully executed, remove the Windows 7 disc or flash drive you booted from in Step 1.
Next, close the Command Prompt window and then click on the Restart button at the bottom of the System Recovery Options window.
Wait While Your Computer Restarts
There’s nothing to do here but wait for your computer to restart and for the Windows 7 login screen to appear.
Just so you know, we don’t make do-nothing steps just for fun. This was included in our walkthrough because many people overlook the bit in Step 8 where you need to remove the Windows 7 disc or flash drive.
While this might have sounded unnecessary, what usually happens if you forget to remove it is that the Windows 7 setup or repair process begins again, as you saw in Step 2. That’s exactly what you wanted then, but right now you should be booting from your hard drive, as you normally do.
So, if you’ve found yourself back where you started, just remove the disc or flash drive and restart.
Click the Ease of Access Button
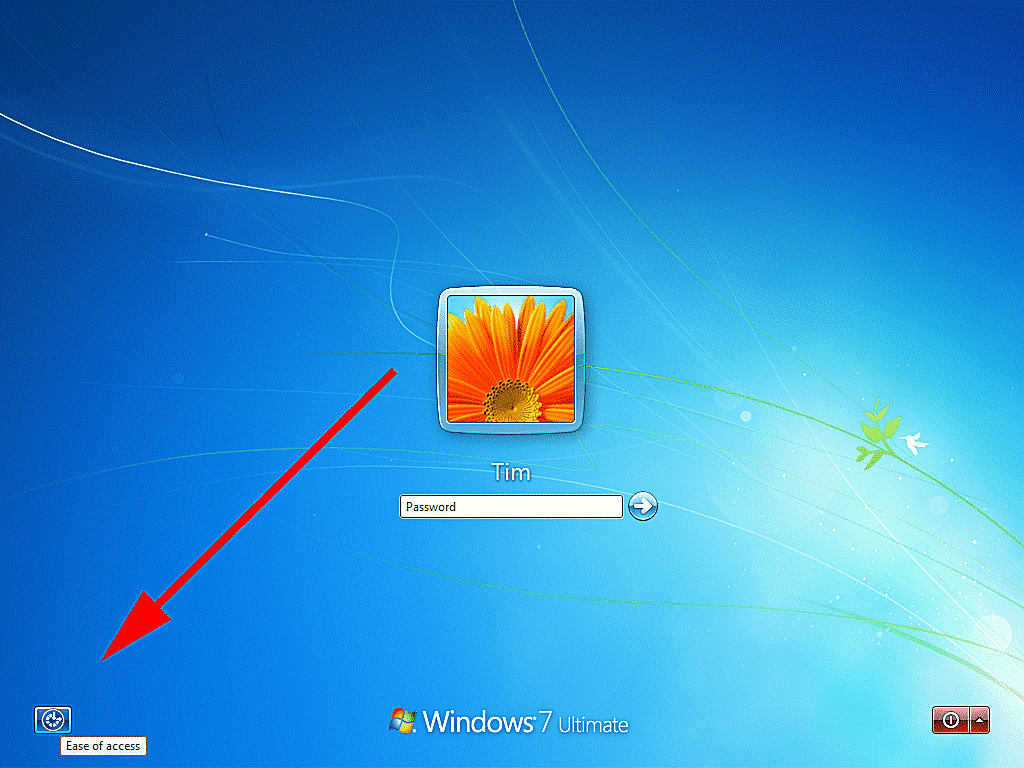
You should now have reached your Windows 7 login screen. No, your password is not reset yet, but we’re about to do just that.
See that little icon on the bottom-left of the screen? Click it!
Typically, the Ease of Access menu appears after pressing this button. However, because we replaced the file representing that tool, utilman.exe, with cmd.exe, Command Prompt appears instead!
Reset Your Password Using Net User
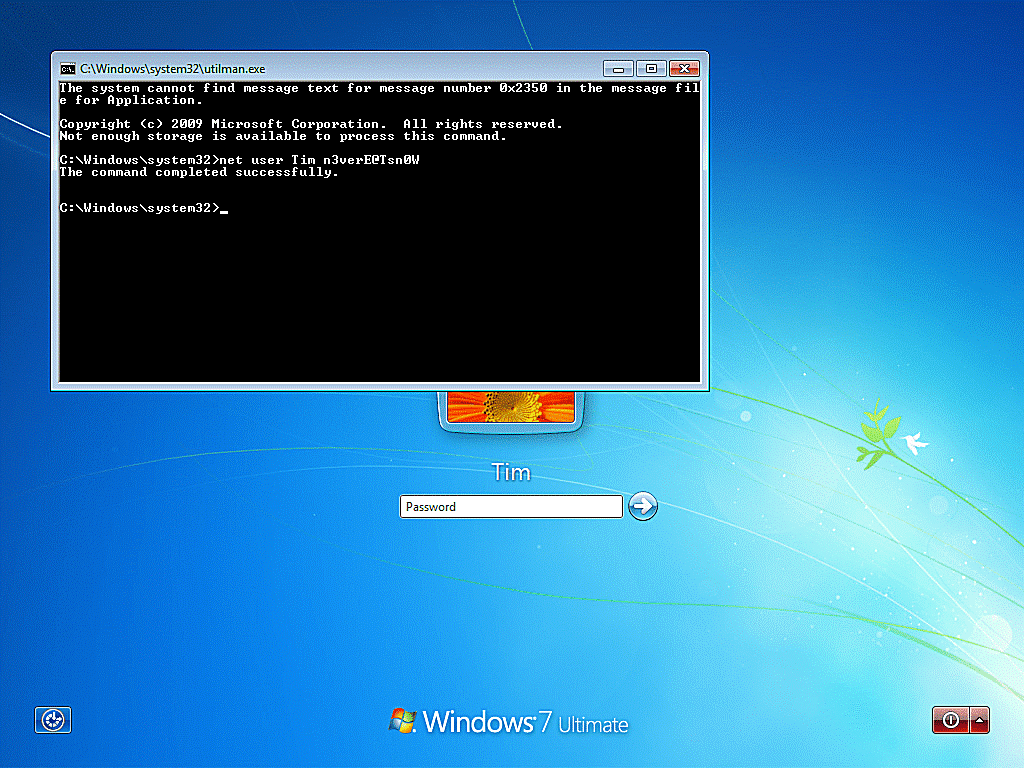
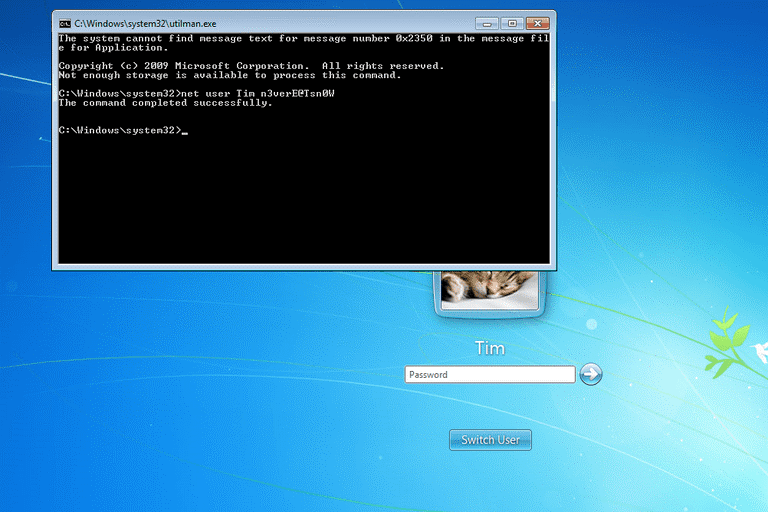
Now that Command Prompt is open, you can reset your Windows 7 password to anything you’d like using the net user command.
The net user command is a really easy command to use. Just execute it like this:
net user username password
…replacing username with your Windows 7 account name, and password with your desired new password.
For example, I might change my password to n3verE@Tsn0W by executing the net user command this way:
net user Tim n3verE@Tsn0W
Assuming everything was executed properly, you should have been greeted with a The command completed successfully. message after pressing Enter.
Tip: There are spaces between net, user, the username, and the password. If your username has a space, like Tim Fisher, use quotes. Reusing my example above but with my full name as my username, I would have executed net user “Tim Fisher” n3verE@Tsn0W.
Not Sure What Your Username Is?
If you were the last person to log in to Windows 7 before forgetting your password, your username should be listed right there on the login screen. You can see Tim in big, bold letters in the screenshot above.
However, if you’re resetting the password to another user on the computer and aren’t sure exactly what the username is, you can generate a list by executing the net user command without options, for example:
net user
A list of all of the users on the computer will be generated right in the Command Prompt window, which you can then reference for proper spelling when changing the password as described above.
Log in to Windows 7 With Your New Password
Finally, we’re at the exciting part!
Close or click away from the open Command Prompt window and then click in the Password field.
Enter your new Windows 7 password you set in Step 11 and then press Enter or click the little arrow button.
Welcome back to your computer!
Tip: If you’re again prompted with a The user name or password is incorrect message, click OK and repeat Steps 10 & 11 again.
YOU’RE NOT DONE YET!
While it may be very tempting to call it quits right now, it’s important that you now take the necessary steps to:
- Prepare for the future event of forgetting your password again so you don’t have to go to all this trouble next time.
- Undo the couple of things that made this password reset trick work.
That’s what we’ll do over the next several steps.
13
of 18
Create a Windows 7 Password Reset Disk
Windows 7 Password Reset Disk.
The Windows 7 password reset procedure we just walked you through is perfectly safe but it isn’t exactly “Microsoft approved.” The only Microsoft sanctioned password reset procedure for Windows 7 involves using a password reset disk.
Unfortunately, this wasn’t an option in your original situation because you have to have access to Windows 7 under your account to create one of these disks. In other words, it’s a proactive step. Now that you can access Windows 7 normally, you can create one and never be caught in a situation like this again.
See How Do I Create a Windows Password Reset Disk? for a complete tutorial.
Open that link up in a new window or bookmark it for later but please remember to do it! You only have to make a password reset disk once. It’ll still be good no matter how many times you change your Windows 7 password and trust me, it’s much easier to use than the procedure you just followed to reset your password this time.
In the next several steps of this walkthrough is where we’ll undo the hack that allowed you to reset your Windows 7 password. Undoing the changes we made will not undo the password change.
14
of 18
Access Command Prompt From Your Bootable Media Again
Command Prompt System Recovery Option.
To reverse the changes you’ve made, you’ll need to again access Command Prompt via your Windows 7 media.
Here’s a quick summary in case you forgot:
- Insert your bootable Windows 7 media.
- Click the Next button.
- Click the Repair your computer link.
- Wait while Windows is found on your hard drive.
- Select Windows 7 and then click Next.
- Click on Command Prompt.
Tip: If you need more detailed help, this summary is referring to Steps 1 through 6 in this walkthrough, which you can reference again.
Do I Really HAVE to Undo These Changes?
No, no one says you have to. However, we strongly suggest that you do, for two reasons:
- Having access to Command Prompt from the login screen is a major security concern. If anyone finds out that Command Prompt is accessible this way, he or she could very easily change your password to access your account and delete your most important files, among other serious things. Reversing the changes you made removes this easy access.
- The Ease of Access tools that are supposed to show up when you click that button on the login screen are there for a good reason. You never know when you, or another person using your computer, might need to take advantage of them.
Hopefully, you decide to take a few extra minutes and complete the next steps.
15
of 18
Execute This Command
Command Prompt in System Recovery.
With Command Prompt now open, type the following command exactly as shown and then press Enter:
copy d:\utilman.exe d:\windows\system32\utilman.exe
As with the previous commands, there are only two spaces here, between copy and d:\ and between exe and d:\. Remember to change the d: to whatever drive Windows 7 is installed on if you need to, just like you may have done in Step 7.
After pressing Enter, you’re presented with the following question:
Overwrite d:\windows\system32\utilman.exe? (Yes/No/All):
Type Y or Yes to confirm the overwrite and then press Enter. Assuming things went as planned, you should see the 1 file(s) copied. confirmation.
What Did I Just Do?
What you just did was copy the utilman.exe backup that you created using the first command in Step 7 back to its original location. In other words, you took things back to the way they were before you started this tutorial.
16
of 18
Remove the Boot Media & Press Restart
Restart Button in System Recovery Options.
Now that you’ve restored the utilman.exe file to its rightful place, remove the Windows 7 disc or flash drive you booted from in Step 14.
Next, close the Command Prompt window and then click on the Restart button at the bottom of the System Recovery Options window.
17
of 18
Wait While Your Computer Restarts
Windows 7 Splash Screen.
Wait while your computer restarts.
As we mentioned the last time you restarted after using your Windows 7 bootable media, you want your computer to start normally, so make sure the flash drive or disc has been removed.
18
of 18
Verify That Ease of Access Works at the Login Screen
Ease of Access in Windows 7.
Remember that little icon you clicked on back in Step 10? Click on it again.
This time, however, instead of seeing Command Prompt, you should see the Ease of Access screen. This is the normal behavior of this button and seeing it confirms that you successfully reversed the changes you made to make this Windows 7 password reset hack work.
Congratulations! You’re done!
In Kaspersky Anti-Virus se merge la Settings – Aditional – Network – Encrypted connections scanning – manage exclusions si se adauga “www.e-licitatie.ro”